Introduction
Managing modern irrigation systems can be complex, but the Talgil DREAM 2 Console makes it easier by providing powerful tools to automate, monitor, and optimize your irrigation processes.
Whether you’re new to the system or looking to improve your existing setup, this tutorial will guide you step by step through the core features of the DREAM 2 Console.
In this guide, you’ll learn how to:
- Log into the DREAM 2 Console.
- Create and schedule efficient irrigation programs.
- Adjust water and fertilizer dosages to meet crop needs.
- Manually control and monitor your irrigation setup.
- Troubleshoot common issues and optimize system performance.

Getting Started
Installation:
To install the DREAM Console Software - please refer to this tutorial:
https://deeco.co.nz/resources/video-how-to-install-talgil-dream-console-software/
Logging Into the DREAM 2 Console
The first step in using the Talgil DREAM 2 system is logging into the Console software. This software allows you to define irrigation programs, control valves, monitor water and fertilizer flow, and generate detailed reports.
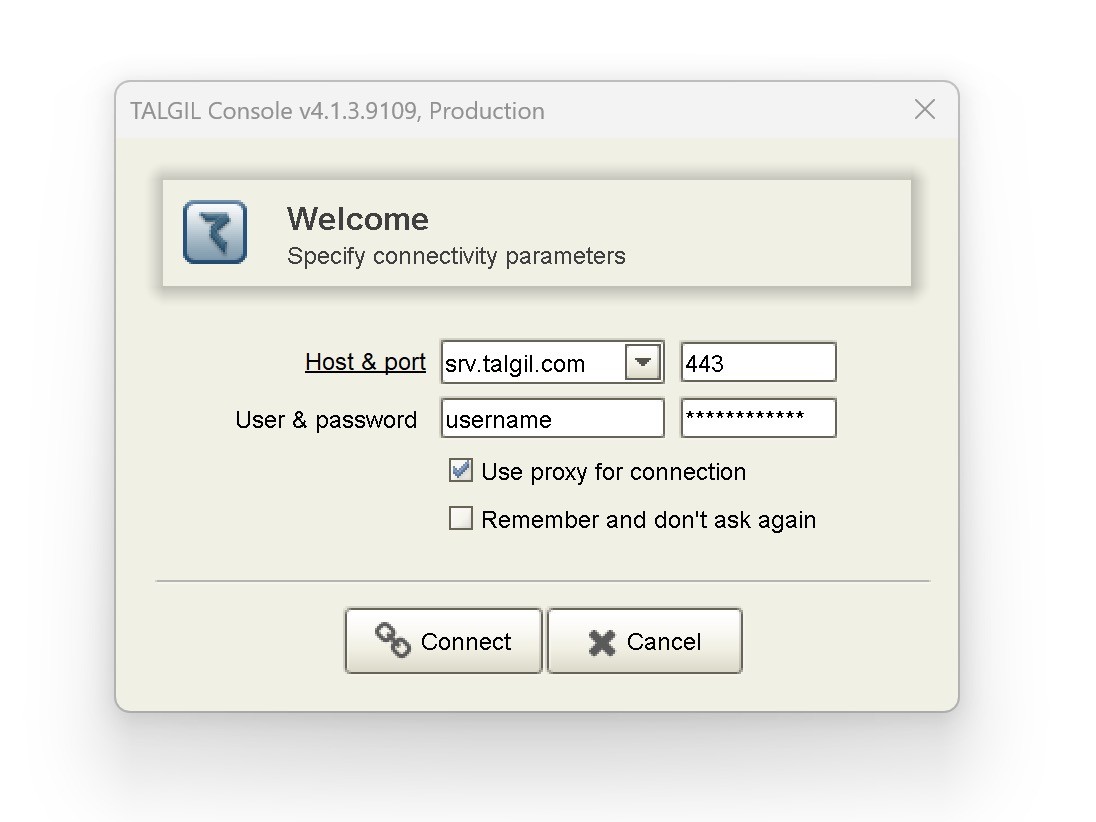
Steps:
- Open the Console:
Double-click the DREAM 2 Console icon on your desktop to launch the software. - Enter Your Login Details:
- Server IP Address: srv.talgil.com
- Port: 443
- Username and Password: Type your login credentials in lowercase letters.
- Optional: Check the Remember Me box to save your username and password for future logins.
- Connect to the System: Click Connect to access the Console interface.
Troubleshooting Tip: If you can’t connect, check your internet connection and ensure that your firewall settings allow access to port 443.
Creating a New Irrigation Program
Now that you’re logged in, it’s time to set up your irrigation program. These programs control when and how much water and fertilizer are applied to your crops.
Irrigation programs can be fully customized, but this tutorial will walk you through a basic setup to get you started.
Steps:
- Navigate to the Irrigation Program Section:
From the main menu, go to Plan > Irrigation Programs. - Create a New Program:
- Click the New Program button to open the program wizard.

1. Follow the steps in the wizard to set up your program

2. Name the Program
Assign a unique name and ID.
Note: ID can be left default.

3. Define Valve Sequence
Each program must have a definition of the sequence of valves included in the program, so step 3 is essential and cannot be skipped.
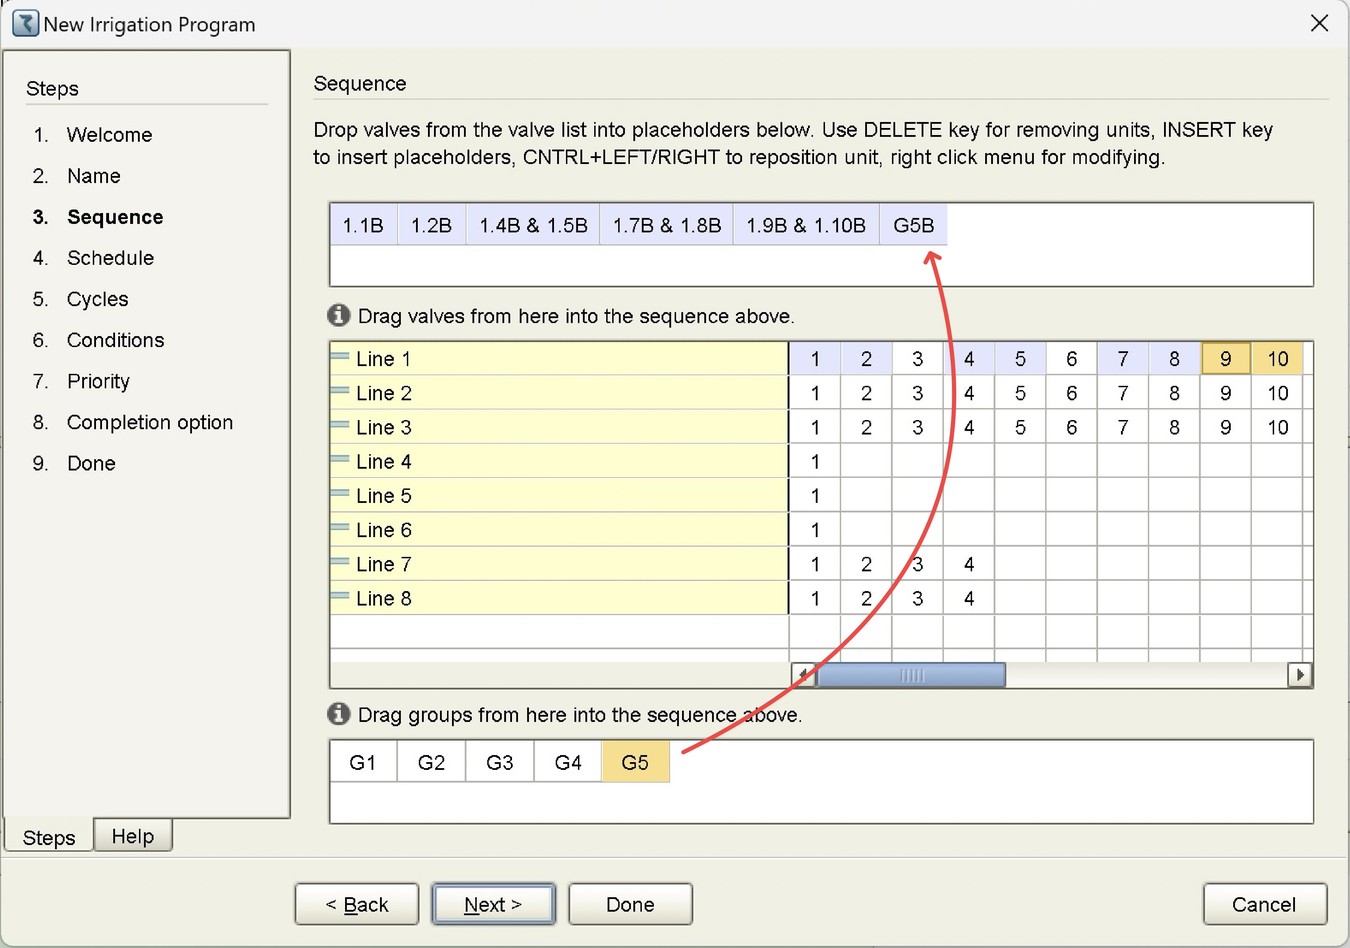
For a single valve to be included in the sequence, the user has to click on the selected valve (it will become yellow) and then it has to be dragged and dropped inside the placeholder as demonstrated screenshot below. As a result the valve will be included in the sequence and a new placeholder will be generated. Any valve/valves that will be placed in the new placeholder will irrigate after the valve in the first place.
Drag and drop valves into placeholders to define the order of operation.

When two (or more) valves of the same line need to be included in the sequence, the Ctrl key of the keyboard has to be held down and then the desired valves have to be marked by clicking and then they have to be dragged into the free placeholder.
As a result the user will be asked whether he wants the valves to work together (&) as an unnamed group with the same water and fertilizer dosage for the whole group, or just start together (+) and each valve will have its own dosage.

When the valves to be combined are of different Irrigation lines, the only option is to have them start together (+) but with separate water dosage per each valve.
Using of the start together (+) option needs to be enabled at the Dealers definition.
If these valves will have to fertilize from a common fertilizer site, they will need to share a common fertilizer dosage.

Predefined Named groups can also be included in the sequence the same way as individual valves.
Additional options with the sequence definition - notice that at each stage of the sequence editing you can right click on any of the included valves and get the following options:
1 - Insert: Insert another job in front of the selected one
2 - Remove: Remove the selected job
3 - Clear: Clear the entire sequence
4 - Water Source: Select the desired water source for the job (if WS is used).
Pro Tip: Learn more about Water Sources and Master Valves here

4. Set Schedule
There can be two ways to schedule irrigation programs, either by using a Cycle of days or by defining a Run-list.
When using the Run-list option, each day of the list can be marked as an irrigation day (W), as a fertigation day (F), or left free (-) by right clicking on the specific day. There is an additional option for a single irrigation only, it will be marked by (S), in this case the irrigation will only be executed on the selected day but no more.
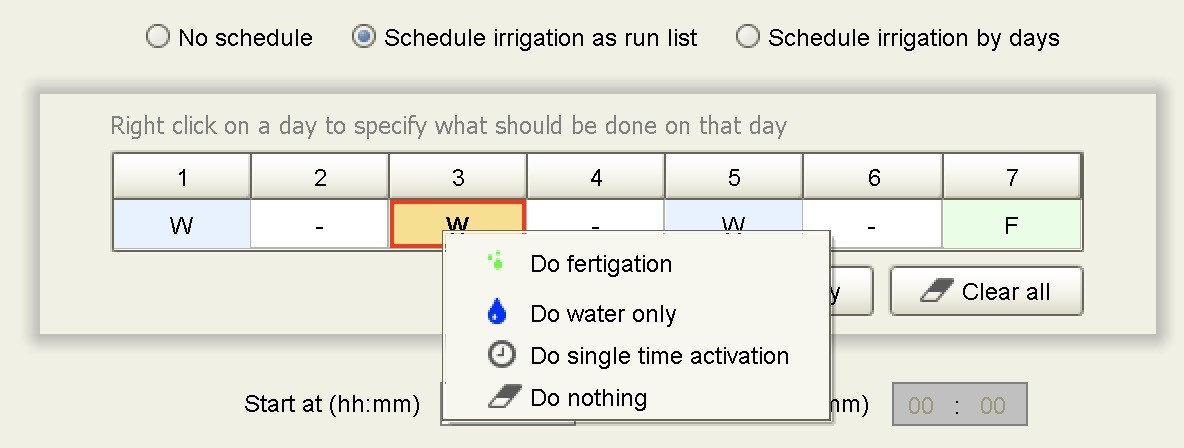

If the Cycle of days is selected, the user needs to define the number of days he needs the irrigation repeated: 1 means every day, 2 means every second days, etc…

5. Defining Repetition Cycles
If the program has to be repeated several times a day, the number of repetition cycles and the interval between the cycles has to be defined.

6. Using conditions
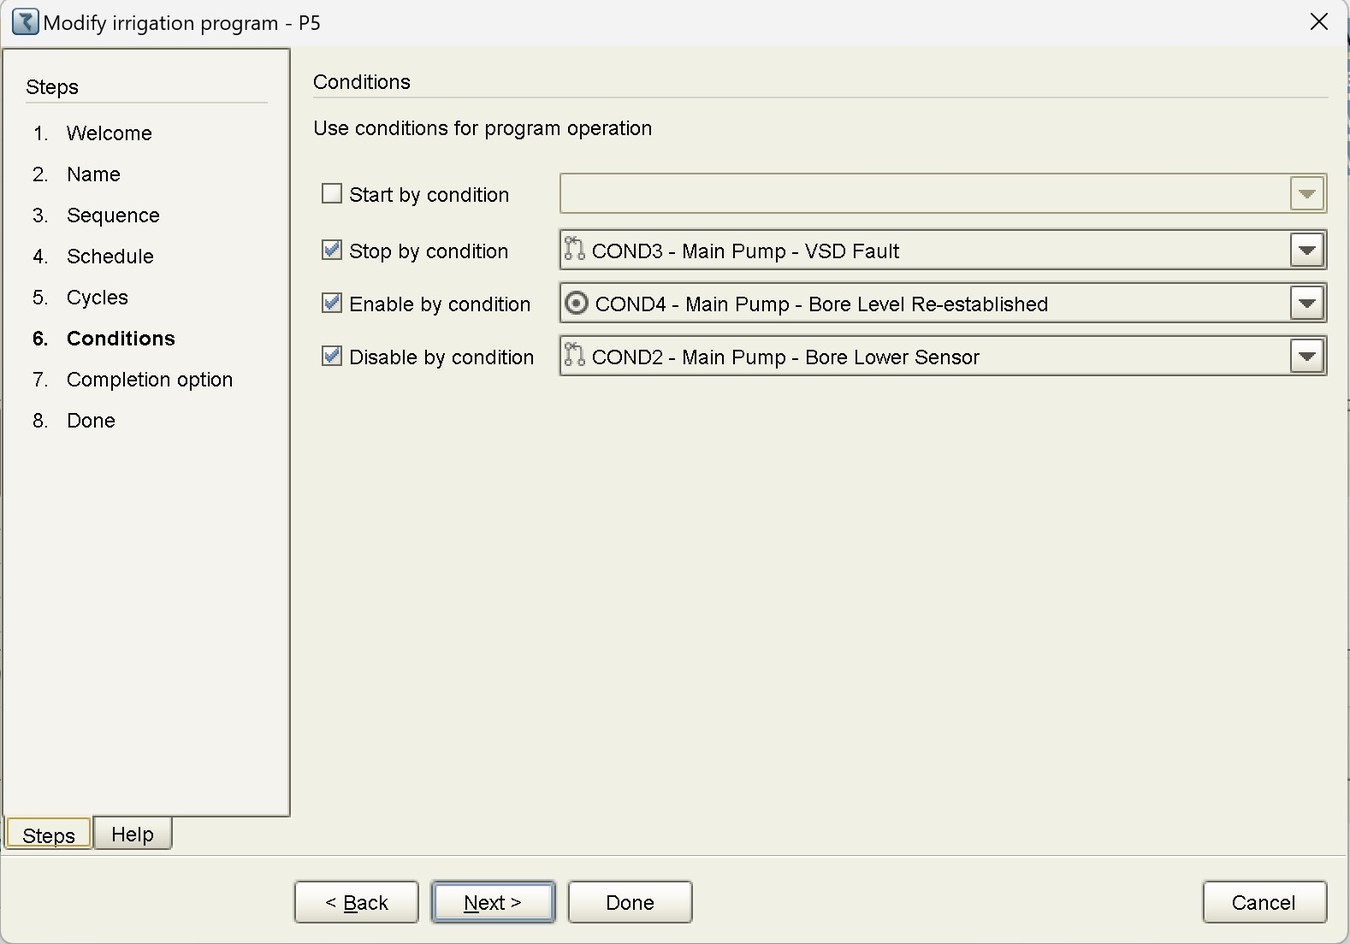
Programs can be influenced by conditions in four ways:
- Started by condition
- Stopped by condition
- Enabled by condition
- Disabled by condition
The user can define which condition will make the program start, or stop, or make it enabled or disabled.
How to define conditions tutorial is coming soon!
7. Completion option
When the completion option is enabled, then at the termination of the last job of the program, the system will make another pass through the jobs of the program trying to complete all those jobs that got some leftovers due to some interruption.

8. Done

When the DONE button is clicked the new program will be displayed at the Selected program view of the Irrigation programs perspective as follows:

Adjusting Water and Fertilizer Dosages
Access the Dosage Settings:
- Select your irrigation program and open the dosage view.
- Configure Water Dosage: Specify the water volume or run time for each valve (or group).
- Configure Fertilizer Dosage: Choose the fertilizer dosing method and set the desired amount.
- Define the Water Before Fertilization and Water After Fertilization if needed.
Save and Apply Changes: Click Send to Target to update the program on the controller.
Advanced Feature: If using EC/pH control, additional parameters can be set to adjust irrigation based on real-time sensor data.

Additional Notes:
- When finished defining all the information in the Irrigation program view the information has to be transmitted to the target by clicking the Send to target button, or if we wish to cancel, click Undo All.

- The same view that is used for planning the irrigation program is also used for watching the progress while the program is running.
- The view of the irrigation program shows also the statuses of the included jobs and their last flow rates.
- There are two irrigation modes in which the user does not define a planned water dosage, instead there is a calculated water dosage which will dictate the amount to be irrigated, these modes are the Irrigation by volume per area, and Irrigation by Evaporation.
- When the Water dosage left is nonzero the program can be started with left quantities instead of the planned quantities.
- The DREAM 2 system recognizes Local fertilizer sites that belong to particular irrigation lines only and Central fertilizer sites that may be shared by several irrigation lines. Any site can have up to 6 fertilizer injectors. Views of irrigation programs will change according to the existing fert sites and injectors on the particular irrigation lines.
- In those cases in which the DREAM 2 is planned to fertilize by EC/pH control, the irrigation program view will contain additional information related with the EC/pH control.
Manually starting/stopping and freezing irrigation programs
When the user wants to manually start a program he first has to click on the program at the List of programs view, the row of the programs gets yellow to indicate that this is the selected program.
Now if we click the Start key options depending on the status and the type of the program as demonstrated below:


Additional Notes:
- When the program is already running, we shall be able to stop it manually by the STOP key.
- There is an option to make the program skip to the next valve in the sequence by the SKIP key.
- Programs can be commanded to Freeze by the FREEZE PROGRAM program will be halted until the resume command is issued.
Monitoring Irrigation Programs
The Irrigation programs perspective is not just for planning your irrigation programs; it is a very useful workspace that supplies a lot of information and enables the users to get a good picture about the happenings in his system and enables him to interfere.
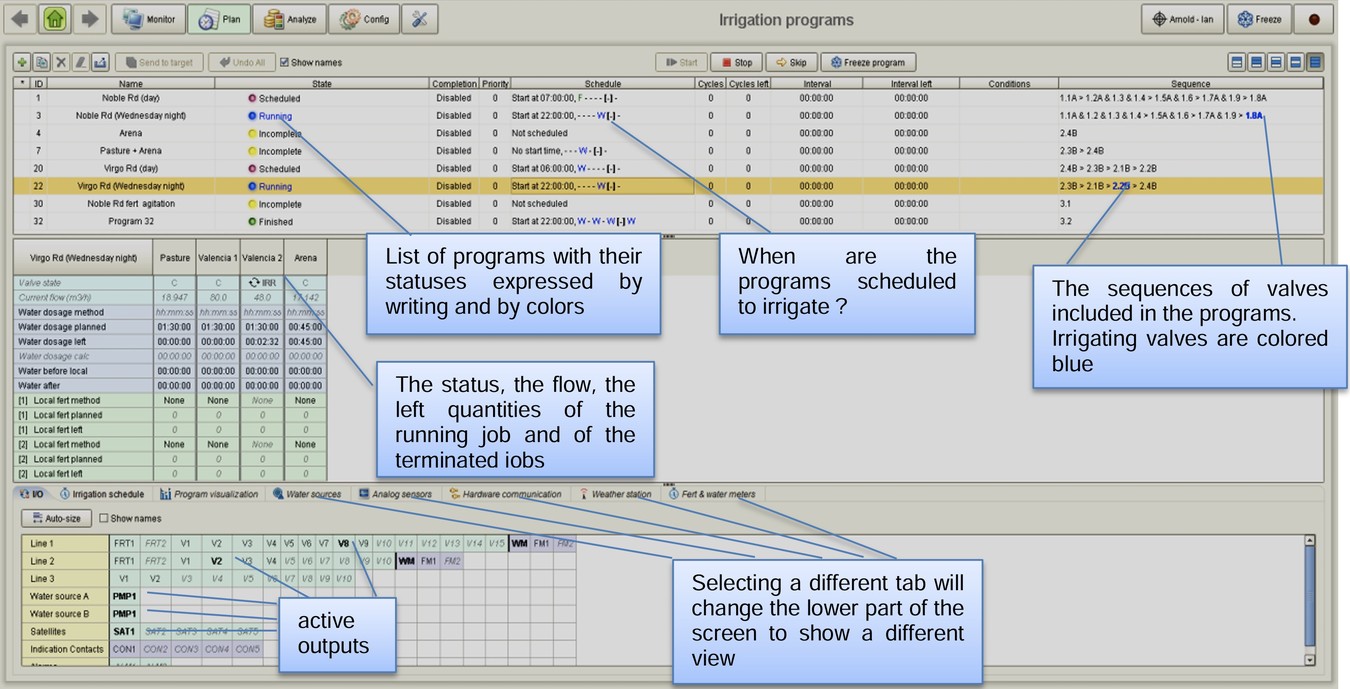
The I/O view - when the I/O view is selected the status of the Inputs and Outputs is displayed.

The I/O list is arranged in rows, each row dealing with a different irrigation line or a different site. The row begins with the outputs indicated by light green background and ends with the inputs colored by light purple background. Pointing at the I/O device will display its name and status.
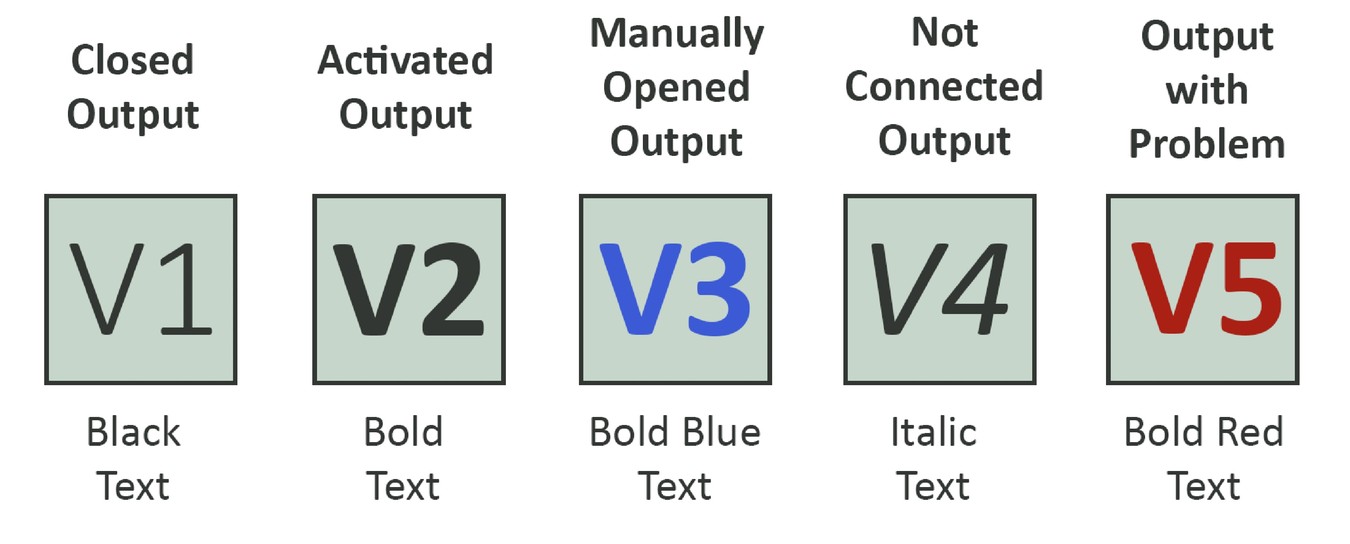
The type of characters used for displaying the outputs and the inputs and the color of the characters indicate their statuses as follows:
- Closed outputs will appear in black
- Outputs activated by programs will be in bold black
- Manually opened output will be bold blue
- Not connected output will be in italic gray
- Output with problem will be in bold red
- Water meter with flow or a closed contact input will appear in bold black
- Water meter without flow or open contact input will appear in black
Right clicking on any output will enable executing manual opening of the output, with/without time limit. Manual opening has lower priority than opening by program.
Valves can temporarily be disabled so that even if they participate in an irrigation program as individual valves or included in some groups, they will stay closed as long as they remain disabled.

The Irrigation schedule view
Supplies a graphic picture of the expected irrigation timetable, helps designing the irrigation in the most efficient way.

Program visualization
Supplies a graphic picture of the stages of a particular program

Water sources view
Supplies information about the activity of the water sources.

Analog sensors view
Supplies real time information about all analog sensors.
The colors indicate the position of the actual reading relatively to the lower limit marking and upper limit marking, as defined at the “Analysis settings”.
Yellow indicates “bellow limit”, Purple indicate “above limit” and white means “within the limit”.

Hardware communication view
Shows the status of the communication with all the peripheral interfaces and RTUs.

Water and fertilizer flow view
Shows the flow of all water meters and fertilizer meters, optionally it will show the flow of free water meters and virtual water meters as well.

Advanced Features and Customization
The DREAM 2 Console offers additional tools for advanced users:
- Alarms Configuration: Set alarms to notify you of specific events, like low flow rates or system errors, under Plan > Alarms.
- Program Library: Save frequently used irrigation programs to the library for quick access and reuse.
- Maps & Diagrams: Create custom maps of your irrigation network under Monitor > Maps & Diagrams to visualize system activity in real time.
- Consumption Reports: Analyze water and fertilizer usage over time to improve efficiency and reduce waste.


